


How to Oil a Vintage Sewing Machine Without Damaging It
Pull out a vintage Singer that’s been sitting in a closet for a decade, thread it up, and hit the foot pedal — and you might hear a sound that stops you cold. A grinding metal-on-metal shriek, or worse, a mechanical thud followed by silence. That’s a seized machine. And nine times out of ten, the culprit isn’t age. It’s lack of oil.
Oiling a vintage sewing machine is the single most important maintenance task you can do. These machines were built to last a century, but they weren’t built to run dry. The factory-specified oil intervals were measured in hours of use, not years of storage. A Singer 66 that ran flawlessly in 1965 and sat in an attic until 2024 needs oil before it runs again — full stop.
Oiling a vintage sewing machine requires pure, clear sewing machine oil applied to every metal-on-metal contact point. Use one drop per oiling port, every 8-10 hours of use. Skip it and you risk seized gears, broken timing, and scored bearing surfaces that no amount of oil will fix afterward.
What Type of Oil to Use
This is where most people go wrong, and it’s worth being blunt: WD-40 is not a lubricant for sewing machines. It’s a water-displacement spray with light petroleum distillates. It will temporarily free a sticky mechanism, then evaporate and leave behind a residue that gums up worse than what you started with. Using WD-40 on a vintage sewing machine is one of the most common and most damaging mistakes in the hobby.
The same goes for 3-in-1 oil. It contains additives and a heavier viscosity than sewing machines need. On older machines with plastic components — even partial plastic gears, which appear on later-era Singers from the 1960s onward — petroleum-based multipurpose oils can cause plastic to swell, crack, or become brittle over time.
What you need is pure, clear sewing machine oil. The gold standard recommendations:
- Zoom-Spout Sewing Machine Oil — comes in a precision-tip bottle, widely available, light viscosity, no additives
- Singer All-Purpose Machine Oil — the brand-name option, fine for vintage machines
- Juki NL-9 — used by professional technicians, slightly more refined
The key properties: it should be clear (not amber or yellow), thin, and odorless. If the bottle says “for sewing machines” and lists nothing but mineral oil or white mineral oil as the base, you’re good. If it has rust inhibitors, detergents, or PTFE additives — put it back on the shelf. Your vintage machine doesn’t need those, and some will leave residue in tight clearances.
One more note: if you’re working on a machine that has nylon gears (common on Singers made after about 1965), make sure your oil is specifically safe for plastics. Pure white mineral oil is fine. Standard mineral oil is usually fine. Some synthetic oils are too aggressive on nylon.
Tools You Need
The good news is you don’t need much. The full kit:
- Sewing machine oil with a precision applicator tip (the Zoom-Spout bottle design is ideal)
- Lint brush or small stiff-bristled brush — an old toothbrush or a dedicated lint brush works
- Flathead and Phillips screwdrivers — for removing the bottom plate, needle plate, and access panels
- Your machine’s manual — Singer published detailed oiling diagrams for every model; downloadable PDFs are available at ISMACS (International Sewing Machine Collectors’ Society) and Singer’s own archive
- Lint-free cloth or paper towels — for wiping excess oil after running the machine
- Flashlight or headlamp — you’ll be peering into dark cavities
Optional but genuinely useful: a watchmaker’s loupe (10x magnification) for inspecting oiling ports and confirming oil has reached the right place. Also handy: a set of dental picks for dislodging compacted lint from tight spaces before you oil.
How Often to Oil
The original Singer instruction books were consistent on this: oil every 8-10 hours of sewing. For a hobbyist sewing a few hours a week, that translates to roughly once a month. For someone sewing daily, it might be every 2-3 weeks.
But here’s the rule that catches people out: oil after storage, not just after use. A machine that sat for 5 years needs oil before its first stitch, even if it was perfectly oiled when it was put away. Oil migrates and evaporates over time. The oil films that protect bearing surfaces have long since dried or drained to the bottom of the machine.
Signs your vintage Singer needs oiling right now:
- Squeaking or squealing when turning the handwheel — classic dry bearing sound
- Stiff handwheel — more resistance than normal; the mechanism is dragging
- Skipped stitches — often timing-related, but a dry hook race can cause the hook to miss the thread loop
- Vibration or rattling that wasn’t there before — loose parts wear faster without lubrication
- Burning smell — metal friction generating heat; stop immediately and oil before running further
A note on over-oiling: too much oil is also a problem. Excess oil migrates to places you don’t want it — into the bobbin case, onto the feed dogs, into the fabric. One drop per oiling point is the rule. You can always add more; you can’t un-oil a stained project piece.
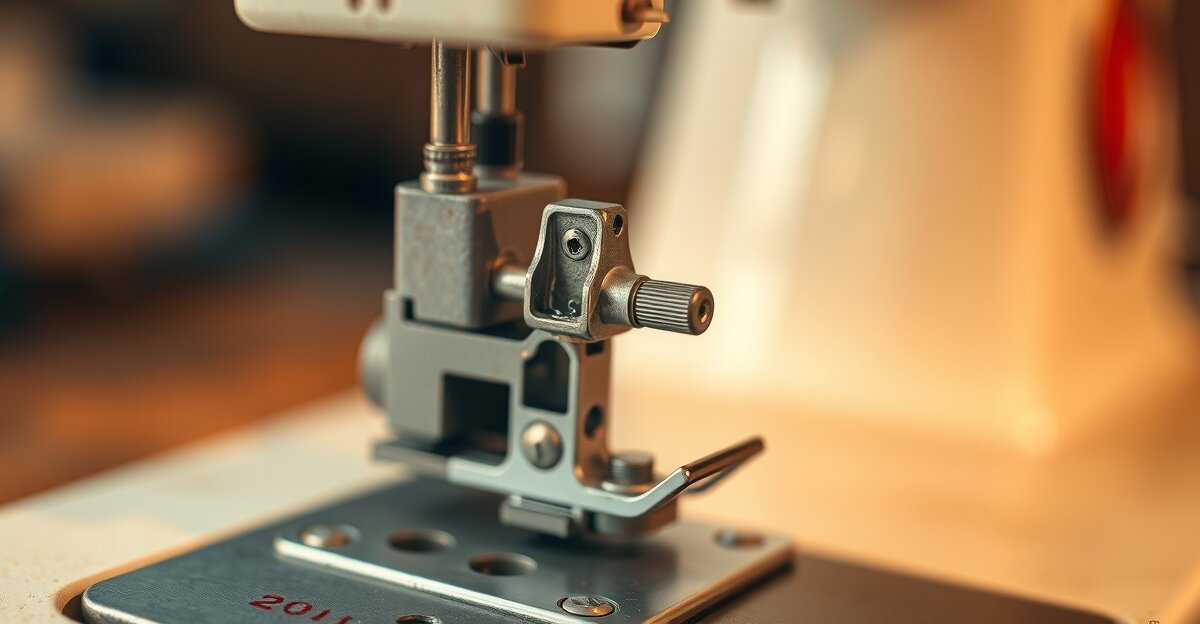
Where to Oil a Vintage Singer
This is the meaty part, and it varies by model. I’ll cover the four most common vintage Singers you’re likely to encounter:
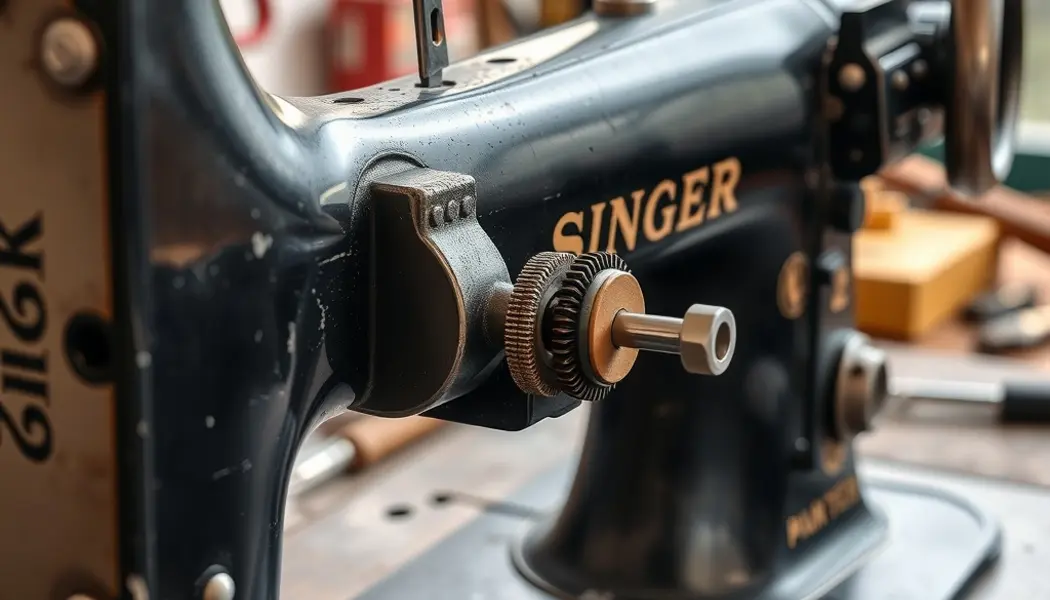
Singer 66 (manufactured 1902–1970s)
The Singer 66 is a full-size machine with a vibrating shuttle (early models) or rotary hook (later). Key oiling points:
- Needle bar — the chrome rod the needle clamps to; oil at the two bushings where it passes through the face plate casting
- Presser bar — next to the needle bar; same two bushing locations
- Arm shaft — the main horizontal shaft visible inside the top arm; oil at each bushing (usually 2-3 points)
- Hook race — the circular channel the hook travels in; this is the most critical point; 1-2 drops directly into the race with the hook rotated to expose the oiling port
- Bobbin shaft — oil at the bushing under the bed
- Lower shaft — accessible through the bottom of the machine after removing the base plate
Singer 99 (manufactured 1911–1960s)
The 99 is the 3/4-size version of the 66 — same general layout, scaled down. The oiling points are identical in type but slightly closer together. The hook race on the 99 is notably smaller, so use a fine-tip applicator. The needle bar on the 99 has a single bushing at the top; don’t miss the lower guide.
Singer 201 (manufactured 1935–1961)
The 201 is widely considered Singer’s finest domestic machine — a rotary hook design with exceptional stitch quality. It has more oiling points than the 66 or 99 because of its more complex mechanism:
- All the standard points above, plus
- The worm gear — visible through the inspection hole in the front of the upper arm; this gear drives the needle bar cam and wears quickly if run dry
- Rotary hook oil port — on the 201, there’s a dedicated oil port on the hook assembly; use the diagram in the manual
Singer 15-91 (manufactured 1930s–1950s)
The 15-91 is a gear-driven rotary hook machine — the gears are what make it so quiet and smooth, and also what make dry running so damaging. The gear train runs from the top shaft down to the hook shaft, and every meshing point needs adequate lubrication. On the 15-91, pay particular attention to:
- The main gear housing — usually accessible from the front face plate; 2-3 drops along the gear teeth
- The hook shaft bushing — under the bed, there’s an access hole specifically for this
For any model you’re not sure about, the Singer manual for that specific model will have an oiling diagram with numbered points. ISMACS has a searchable archive of Singer manuals going back to the 1880s.
Step-by-Step Oiling Process
Here’s the sequence that works, in order:
- Remove the needle — you’ll be turning the machine by hand and don’t want a needle in the path of your fingers
- Remove the presser foot and slide plate — gives access to the needle bar area and hook race from the front
- Remove the bottom plate or base — most vintage Singers have a removable base plate (usually 2-4 screws); this exposes the lower shaft and connects you to the underside oiling ports
- Clean lint first — use the lint brush to clear compacted fluff from around the hook race, bobbin shuttle area, and any oiling ports. Lint mixed with oil turns into an abrasive paste. Don’t oil over lint.
- Apply oil — one drop per point — work systematically from top to bottom. Apply one drop, move to the next point. Don’t flood any single point.
- Turn the handwheel 10-15 rotations by hand — this distributes the oil through the mechanism. You want to hear the machine become slightly quieter and feel it turn a bit more freely.
- Wipe all external surfaces — any oil that seeped out of ports will be on the casting; wipe it off so it doesn’t migrate to fabric later
- Run the machine for 2-3 minutes without thread — this further distributes oil and lets any excess work its way out
- Wipe again — check under the machine and around the hook race for any weeping excess
Where NOT to Oil
Just as important as where to oil is where to stay well away:
- Inside the bobbin case — the bobbin case tension spring is calibrated to a specific friction. Oil here will change the tension and cause uneven stitches. Keep it dry.
- The feed dogs — fabric grips the feed dogs through friction. Oil on the feed dogs means slipping fabric and uneven feed. If oil gets here, wipe thoroughly and run scrap fabric through before sewing anything real.
- The presser foot sole — same reason as feed dogs
- The motor — external motors on vintage Singers (the black box bolted to the side or underneath) are sealed units. If the motor bearings need oil, that’s a different job entirely — most use a specific port labeled with an oil can symbol. Don’t oil the motor housing, wiring, or carbon brushes.
- The tension discs — the thread tension mechanism relies on calibrated spring pressure and clean disc surfaces. Oil here changes tension and is difficult to remove completely.
After Oiling: Test Stitches on Scrap Fabric
Never go straight from oiling to your actual project. This isn’t overcaution — it’s practical experience. Here’s what happens if you skip this step:
Excess oil that wasn’t fully wiped will wick onto fabric with the first few stitches. On a light-colored fabric, this shows as a translucent oil stain around the needle entry points. Depending on the fabric, this can be permanent. On silk, it’s devastating.
The test procedure:
- Thread the machine with a mid-weight thread in a color you don’t care about
- Load a scrap of plain white cotton or muslin — white shows oil spots immediately
- Sew 3-4 rows of straight stitch at medium speed
- Check the fabric under good light for any oil spots
- If you see spots, wipe the machine again and run more scrap fabric through
- Repeat until no spots appear on the test fabric
You’re also listening during this test. A freshly-oiled machine should sound smooth and even. Any grinding, clicking, or irregular sounds during the test stitch mean something needs further attention — possibly a timing adjustment (see our guide on Singer 99K timing issues for how that diagnosis works) or a component that’s too worn to be helped by oiling alone.
Common Oiling Mistakes to Avoid
After seeing dozens of vintage machines come through for repair, these are the mistakes that come up again and again:
- Using the wrong oil — covered above, but worth repeating. WD-40 and 3-in-1 are the two biggest offenders. Olive oil and cooking oils are also surprisingly common mistakes — they go rancid and polymerize into a varnish.
- Oiling without cleaning first — lint + oil = grinding compound. Always brush out the mechanism before applying oil.
- Over-oiling a single point — one drop. Not five. More is not better. The bearing surfaces hold a film of oil; flooding them just sends the excess somewhere you don’t want it.
- Skipping the bottom plate — the lower half of the machine has as many critical oiling points as the top. Most people only oil what they can see from the front. Remove the base plate every time.
- Oiling a machine that needs cleaning instead — if the mechanism is gummed up with old dried oil (looks brown or black, sticky, like shellac), fresh oil won’t cut through it. You need a cleaning solvent (Tri-Flow or mineral spirits on a cloth) to dissolve the old residue before fresh oil will do any good.
- Not running the machine after oiling — oil needs to be worked into the surfaces by motion. A machine that’s oiled and immediately put away will have oil sitting in pools rather than on bearing surfaces.
For more on keeping your vintage machine in full working order, the vintage equipment restoration guide covers the full maintenance picture, from motor servicing to decal preservation.
Frequently Asked Questions
Can I use baby oil on a vintage sewing machine?
Baby oil is mineral oil with fragrance added — the fragrance is the problem. Pure mineral oil is actually close enough to sewing machine oil that it’s used as a substitute in a pinch. But the fragrance additives in baby oil can leave residue and may attract lint. Stick with labeled sewing machine oil for best results, and if you need an emergency substitute, look for 100% pure mineral oil (often sold in pharmacies as a laxative, no joke).
My machine has been in storage for 20 years. Can I just oil it and run it?
Oil it first, then turn it slowly by hand before running the motor. If it turns freely by hand after oiling, you can run it slowly. If it feels stiff or gritty despite fresh oil, the old dried oil needs to be dissolved out before running under power. Forcing a gummed mechanism under motor power can strip gear teeth or score bearing surfaces. Use a cleaning solvent on the moving parts first, let it dry, then oil fresh.
How do I know when I’ve applied enough oil?
One drop per oiling port is the standard. You should see a small, shiny wet spot at the port after application. If the oil is immediately absorbed and the port looks dry, apply a second drop — the bearing surface was very dry. But don’t exceed two drops per port in a single session. You can always re-oil sooner if needed.
My machine is still squeaking after oiling. What’s wrong?
A few possibilities: you may have missed an oiling point (go back to the manual diagram and check each one); the old oil may be gummed and blocking fresh oil from reaching the bearing surface; or there may be a worn bearing that needs replacement. If the squeak is specifically from the needle bar area and persists after oiling, check the needle bar bushing for wear — a worn bushing creates a metal-on-metal contact that oil can’t fully compensate for.
12 thoughts on “How to Oil a Vintage Sewing Machine Without Damaging It”
Comments are closed.